Saturday, August 31, 2013

AM Receiver Circuit

Description:
This is a compact three transistor, regenerative receiver with fixed feedback. It is similar in principle to the ZN414 radio IC which is now no longer available. The design is simple and sensitivity and selectivity of the receiver are good.
Circuit Diagram

Notes:
All general purpose transistors should work in this circuit, I used three BC109C transistors in my prototype.The tuned circuit is designed for medium wave. I used a ferrite rod and tuning capacitor from an old radio which tuned from approximately 550 - 1600kHz. Q1 and Q2 form a compund transistor pair featuring high gain and very high input impedance. This is necessary so as not to unduly load the tank circuit.
The 120k resistor provides regenerative feedback,between Q2 output and the tank circuit input and its value affects the overall performance of the whole circuit. Too much feedback and the circuit will become unstable producing a "howling sound". Insufficient feedback and the receiver becomes "deaf". If the circuit oscillates,then R1s value may be decreased; try 68k. If there is a lack of sensitivity, then try increasing R1 to around 150k. R1 could also be replaced by a fixed resisor say 33k and a preset resistor of 100k. This will give adjustment of sensitivity and selectivity of the receiver.
Transistor Q3 has a dual purpose; it performs demodulation of the RF carrier whilst at the same time, amplifying the audio signal. Audio level varies on the strength of the received station but I had typically 10-40 mV. This will directly drive high impedance headphones or can be fed into a suitable amplifier.
Construction:
All connections should be short, a veroboard or tagstrip layout are suitable. The tuning capacitor has fixed and moving plates. The moving plates should be connected to the "cold" end of the tank circuit, this is the base of Q1, and the fixed plates to the "hot end" of the coil, the juction of R1 and C1. If connections on the capacitor are reversed, then moving your hand near the capacitor will cause unwanted stability and oscillation.
Finally here are some voltagee checks from my breadboard prototype.This should help in determining a working circuit:-
All measurements made with a fresh 9volt battery and three BC109C transistors with respect to the battery negative terminal.
Parts
Q1 (b) 1.31V
Q2 (b) 0.71V
Q2 (c) 1.34V
Q3 (b) 0.62V
Q3 (c) 3.87V

Author: Andy Collinson
Source: http://www.zen22142.zen.co.uk
Thursday, August 15, 2013

Simple AC Power Current detector Circuit with LM1458

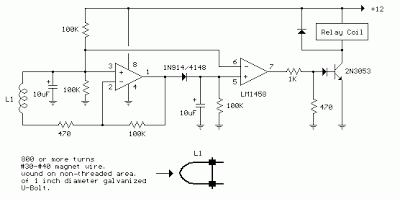
This circuit will detect power line currents of 250 mA or more without making electrical connections to the line. Current is detected by passing a line of alternating current through an inductive pickup (L1) as a screen diameter of 1 inch U-bolt wound with 800 turns # 30 – # 35 magnet wire.

The pickup could be made from rings of iron or other type of processor core that allows enough space to pass one of the AC lines through the center. Only one of the power line is the line or neutral must come from the center of the pickup to avoid the fields cancel.

Simple AC Power Current detector Circuit with LM1458

I tested the circuit with a 2 wire extension cord that had separated the twin wires a small distance with an exacto knife to allow the U-bolt to encircle a single cable. The magnetic pick-up (U-bolt) produces about 4 millivolts peak for a series of alternating current of 250 mA, or AC load of around 30 watt

The signal from the pickup has grown about 200 times the output of pin op-amp 7, followed by the peak detected by diode and capacitor connected to pin 7. The second op-amp used as a reference point, which detects voltage increases above the drop pass.

The minimum mark required to cause the comparator output stage is a positive change of 800 mV peak around a power line 30-watt. The 1458 swing op-amp output in just a couple of times the ground so a voltage divider (1K/470) is used to reduce the voltage signal at about 0,7 volt.

An additional diode added in series with transistor base to ensure that off when the voltage op-amp is 2 volts. You can get a piece “of relay chatter if the AC load is close to the switching point so a larger load 50 W or higher recommended. The sensitivity can be increased by adding more becomes a pick-up

Tuesday, August 13, 2013

Simple 500W Audio Power Amplifier Circuit Diagram with Transistor

We take transistor MJL2194 and MJL2193 for drive output signal.so the amp has a capacity for enormous instantaneous current ability.

 Simple 500W Audio Power Amplifier Circuit Diagram with Transistor

I think, it is useful for you to apply the circuit with your sound devices.

Circuit Functional
I use the -85 volt when the output current is supplied to the drive 350 to 340 very hot. Increase the output current, but it was too cold. The output to heat up faster than a normal open it. Sounds obvious, but sound quality is quite good.

I recomment it by turning out for the evening. If the drive is mounted on the metal part out.

I think simple. View full above, the observation that R 30 ohm then the voltage across the 0.86 V show that the new through its 29 mA if you add a file to / – 85 V, and suppose that the voltage across the component body. It was the same in both the R 30 ohm to get a very light 5 0.86 = 5.86 V and the current I will be 5.86/30 = 0.195 A = 195 mA, and the specification of mje340. mje350 get Ic (max) = 500 mA, so it is natural for it to heat up. Actually, it is not necessary to adhere to sync tr output should be interested in the following two tr power drive is better. For VR should be R300 .

Sunday, August 11, 2013

12V Speed Controller Dimmer

This handy circuit can be utilized as a velocity regulateler for a 12V motor rated up to 5A (continuous) or as a dimmer for a 12V halogen or usual incandescent lamp rated up to 50W. It varies the facility to the weight (motor or lamp) the usage of pulse width modulation (PWM) at a pulse frequency of around 220Hz.  SILICON CHIP has produced quite a few DC speed regulatelers through the 12 monthss, the most latest being our high-power 24V 40A design featured in the March & April 2008 considerations. Another very popular design is our 12V/24V 20A design featured in the June 1997 issue and we've also featured plenty of reversible 12V designs.
 
Project Image :
 12V Speed Controller/Dimmer Project Image

For many utilitys although, a lot of these designs are over-kill and a much more effective circuit will suffice. Which is why we are offering this basic design which uses a 7555 timer IC, a Mosfet and no longer much else. Being a easy design, it does no longer screen motor back-EMF to supply superior speed legislation and nor does it have any fancy overload safety aside from a fuse. However, it is a very environment friendly circuit and the equipment cost is somewhat low.

Parts layout:


Connection diagram:


There are many softwares for this circuit with the intention to all be in protecting with 12V motors, lovers or lamps. You can use it in automotives, boats, and recreational vehicles, in variation boats and adaptation railways and so on. Want to keep watch over a 12V fan in a car, automotiveavan or computer? This circuit will do it for you. The circuit makes use of a 7555 timer (IC1) to generate variable width pulses at about 210Hz. This forces Mosfet Q3 (via transistors Q1 & Q2) to control the rate of a motor or to dim an incandescent lamp.

Circuit diagram :
12V Speed Controller/Dimmer Circuit Diagram

While the circuit can dim 12V halogen lamps, we must point out that dimming halogen lamps may be very wasteful. In state of affairss where you need dimmable 12V lamps, you will be a lot better off substituting 12V LED lamps which are now conveniently available in standard bayonet, miniature Edison screw (MES) and MR16 halogen bases. Not simplest are these LED alternative lamps far more efficient than halogen lamps, they do not get any place close to as hot and additionally will last an ideal deal longer.

Source : Silicon Chip

Friday, August 9, 2013

Telephone Call Recorder

Today telephone has become an integral part of our lives. It is the most widely used communication device in the world. Owing to its immense popularity and widespread use, there arises a need for call recording devices, which find application in call centres, stock broking firms, police, offices, homes, etc. Here we are describing a call recorder that uses very few components. But in order to understand its working, one must first have the basic knowledge of standard telephone wiring and a stereo plug.

Telephone Call Recorder Circuit diagram

In India, landline telephones primarily use RJ11 wiring, which has two wires—tip and ring. While tip is the positive wire, ring is the negative one. And together they complete the telephone circuit. In a telephone line,  voltage between tip and ring is around 48V DC when handset is on the cradle(idle line). In order to ring the phone for an incoming call, a 20Hz AC current of around 90V is superimposed over the DC voltage already present in the idle line.  The negative wire from the phone line goes to IN1, while the positive wire goes to IN2. Further, the negative wire from OUT1 and the positive wire from OUT2 are connected to the phone. All the resistors used are 0.25W carbon film resistors and all the capacitors used are rated for 250V or more.
The negative terminal of ‘To AUX IN’ is connected to pin 1 of the stereo jack while the positive terminal is connected to pins 2 and 3 of the stereo jack. This stereo jack, in turn, is connected to the AUX IN of any recording device, such as computer, audio cas-sette player, CD player, DVD player, etc. Here we shall be connecting it to a computer. When a call comes in, around 90V AC current at 20Hz is superimposed over the DC voltage already present in the idle line.
Telephone Call Recorder Mic
This current is converted into DC by the diodes and fed to resistor R1, which reduces its magnitude and feeds it to LED1. The current is further reduced in magnitude by the resistor R2 and fed to the right and left channels of the stereo jack, which are connected to the AUX IN port of a computer.  Any audio recording software, such as AVS audio recorder (available at: http://www.avs4you.com/AVS-Audio-Recorder.aspx), Audacity audio recorder (http://audacity.sourceforge.net/), or audio recorder (http://www.audio-tool.net/audio_recorder_for_free.html), can be used to record the call. When a call comes in, one needs to launch the audio recording software and start recording.
Telephone Call Recorder
For phone recording, simply connect the stereo jack to the AUX IN port of the PC. Install the  Audacity audio recorder (different versions are available for free for different operating systems at http://audacity.sourceforge.net/) on your PC. Run the executable  Audacity file. In the main window, you will find a dropdown box in the top right corner. From this box, select the AUX option. Now you are ready to record any call. As soon as a call comes in, press the record button found in the Audacity main window and then pick up the telephone receiver and answer the call. Press the stop button once the call ends. Now go to the file menu and select the ‘Export as WAV’ option and save the file in a desired location.

You may change the value of resistor R2 if you want to change the output volume. You can use a variable resistor in series with R2 to vary the volume of the output. The recorded audio clip can be edited using different options in the  Audacity software. You can assemble the circuit on a general-purpose PCB and enclose it in a small cabinet. Use an RJ11 connector and stereo jack for connecting the telephone set and computer (for call recording). Telephone cords can be used to connect to the phone line and the circuit. Use of a shielded cable is recommended to reduce disturbances in the recording. These can also be reduced by increasing the value of R2 to about 15 kilo-ohms.
EFY note. Audacity recording software is included in this month’s EFY-CD under ‘Utilities’ section.

Source: http://www.ecircuitslab.com/2011/07/telephone-call-recorder.html

Wednesday, August 7, 2013

1998 Toyota Land Cruiser Electrical Wiring Diagram

1998 Toyota Land Cruiser Electrical Wiring DiagramThis is the Official Repair Manual that the dealers and shops use. This is the finest manual available. It is very detailed with good diagrams, photos and exploded views. A must for anyone who insists on Genuine OEM quality parts.

you can buy this diagram books at here

Monday, August 5, 2013

2005 Toyota 4Runner The Rear Windshield Wiper Is Not Working


My car is the 2005 Toyota 4Runner, and my rear windshield wiper is not working, the cleaning fluid also does not come out on the back windshield. My car is still under warranty but before I call the dealership, does anyone has any suggestion on what the problem might be? I want to try some solutions my self since I learn that if I take my car to the shop and I don’t have to b/c, it cots me something, thanks.
 

Answer: Just check the fuses, if the dealership suspects you for messing with something, they could void the warranty. The rear wipers might use separate fuse from the front, what you need to do is just to make sure that every thing is plug in. You could find the plug near the gate.


Saturday, August 3, 2013

TA7230P TA7236P TA7237AP amplifier schematic

Amplifier circuit here is all based on the ic in the gains. Three IC TA7230P, TA7236P, TA7237AP is intregated circuit (IC) which was applied to the power amplifier. Each IC has a different output, different input voltage, all IC TA7230P, TA7236P, TA7237AP is manufactured by Toshiba.

You can see maximum minimum voltage , power output , and other here
TA7230P, TA7236P, TA7237AP amplifier schematic

Thursday, August 1, 2013

1997 Audi A4 Air Conditioning System Circuit and Schematic Diagram on 1997 Audi A4


The following wiring diagram / scematic shows 1997 Audi A4 air conditioning system Circuit and Schematic Diagram which consists of A/C control head, footwell/defroster, flap motor and sensor, temperature regulator, motronic engine control module, interior temperature fan and sensor, digital outside air temperature/ transmission range selector lever display, sunlight photo sensor, A/C compressor speed sensor, outside temperature sensor, fresh air intake duct, fuse panel and instrument cluster, A/C compressor clutch relay, central flap motor and sensor, back pressure motor and sensor, center outlet temperature sensor, fresh air blower, coolant fan control thermal switch, coolant fan, and coolant fan control relay. 


For detailed information about 1997 Audi A4 Air Conditioning System Circuit and Schematic Diagram here (diagram 1 and diagram 2, source: autolib.diakom.ru)